Sunday, May 19, 2013

Conferendo videochat for android

 
 Conferendo Videochat for Android
ကဲဒီေကာင္ေလးကေတာ့ အရင္တံုးကေတာ့ VZO အခု
5 လပိုင္းထဲမွာအသစ္ထြက္ Conferendo အျဖစ္ေျပာင္းသြားတယ္
VZO နဲ႕ Conferendo နဲ႕တူတူပါဘဲ
ေျပာရရင္ VZO ကို Android ဖုန္းမွာသံုးလို႕ရျပီေပါ့
အခုလူေတြေတာ္ေတာ္ေလးကိုစိတ္၀င္စားေနပံုရတယ္ဗ်ာ့
အဆင္ေျပပါေစေနာ္
တကယ္လို႕မ်ားအဆင္မေျပဘူးဆိုရင္
comments ေရးေပးခဲ့ပါ
ေအာင္ေက်ာ္ေဇယ်မိုးဟိန္းထြန္း
azy228@gmail.com


ျမန္မာအိုင္တီၿမိဳ႕ေတာ္သို႔ Android ဖုန္းမွ ဝင္ေရာက္ဖတ္ရႈႏိုင္ရန္ apk(2)

ျမန္မာအိုင္တီၿမိဳ႕ေတာ္သို႔ Android ဖုန္းမွ ဝင္ေရာက္ဖတ္ရႈႏိုင္ရန္ apk
ကဲအခု ကၽြန္ေတာ္တို႕ ျမန္မာအိုင္တီျမိဳ႕ေတာ္ကို 
Android ဖုန္းမွအလြယ္တကူ
ဖြင့္နိဳင္ရန္အတြက္
ဖန္တီးထားသည္။
Software ဖန္တီးသူ
ေအာင္ေက်ာ္ေဇယ်မိုးဟိန္းထြန္း
ကဲအဆင္ေျပပါေစေနာ္
တကယ္လို႕မ်ားအဆင္မေျပဘူးဆုိရင္
comments ေရးေပးခဲ့ပါ
ေအာင္ေက်ာ္ေဇယ်မိုးဟိန္းထြန္း
azy228@gmail.com

သင့္ Blogger site ကို ျမန္ဆန္ေစမယ့္နည္းလမ္းမ်ား (အပိုင္း-၂) [Blogger only]

မဂၤလာပါ။ Tech in Blogging မွ ဘေလာ့အျမည္းေလးတစ္ခုတင္ေပးပါဦးမယ္ဗ်ာ။ သင့္ Blogger site ကို ျမန္ဆန္ေစမယ့္နည္းလမ္းမ်ား ကို ပထမတုန္းကတင္ၿပီးေလျဖစ္ပါတယ္။ ဒီတစ္ခါေတာ့ အဲ့ဒါကို ျဖည့္စြက္ တင္ဦးမွာပါ။ ဆက္ဖတ္ၾကည့္ပါ။


အနည္းဆံုး ၅ပိုစ့္ပဲ ပင္မမွာထည့္ပါ။ ကြ်န္ေတာ္ကေတာ့ ၇ပိုစ့္ပဲသံုးပါတယ္။ Google + Commenting System ပါလာၿပီဆုိရင္ေတာ့ ကိုယ့္ဘာသာကိုယ္သင့္ေတာ္ေအာင္ ၾကည့္သံုးပါ။ ကြ်န္ေတာ္ခု ထည့္နည္းေလးပါ ေျပာျပလိုက္ပါမယ္။

ထည့္နည္းကေတာ့ Blogger ကိုသြားပါ။ Settings ကိုသြားပါ။ Posts and comments ကိုကလစ္ၿပီး Posts ရဲ႕ေအာက္မွာ Show at most ? မွာ သင့္ေတာ္သလိုတာေရြးေပေတာ့။ အေကာင္းဆံုးကေတာ့ ၆ႏွင့္၇ ပိုစ့္အၾကားပဲေကာင္းပါတယ္။

ခုနက အေပၚက အဆင့္တုိင္ၾကည့္ရွင္းပါ။ ဆုိးက်ိဳးကေတာ့ သင့္ Blog site ရဲ႕ speed ႏွဳန္းက်သြားမယ္ျဖစ္တဲ့အတြက္ ပိုစ့္ေတြကိုေလွ်ာ့လိုက္ပါ။ Google + ရဲ႕ Commenting System ကို http://techinblogging.blogspot.com/2013/05/google-commenting-system.html မွာဖတ္ၾကည့္ပါ။


လူတုိင္းက ျဖတခ်ိဳ႕ Blog site ေတြဆုိရင္ မလိုလည္းထည့္ လုိလည္းထည့္ေတာ့ ေလးေနတာေပါ့ဗ်ာ။ ေဘးမွာ အမ်ားႀကီးထည့္ခဲ့မိရင္ ေတာ္ရုံနဲ႕ အင္တာနက္ကြန္နက္ရွင္မေကာင္းတာနဲ႕ အျပည့္မတက္လာေတာ့မွာမဟုတ္ပါဘူး။ အျပည့္မတက္လာလွ်င္ Warning ေတြခဏခဏ တက္လာမွာျဖစ္ၿပီး လာလည္သူေတြအတြက္ function အျပည့္ၾကည့္လို႕ရမွာမဟုတ္ပါဘူး။ တျခားနည္းလမ္းေတြရွိပါေသးတယ္ ဒီမွာ ဖတ္ၾကည့္ပါ။

ေလွ်ာ့နည္းကေတာ့ ဒီလိုရွိပါတယ္။ ပံုေတြကိုေလွ်ာ့လိုက္ပါ။ Blogger Widgets ႏွင့္ html , ပံုအမ်ိဳးမ်ိဳးစသျဖင့္ ေလွ်ာ့သင့္ပါတယ္။


ဓာတ္ပံုနဲ႕ Script (javascript, html, .etc..)  တို႕တင္မယ္ဆုိရင္ Hosting တစ္ခုတည္းကိုပဲေရြးပါ။ ဓာတ္ပံုေတြ တင္မယ္ဆုိရင္ PhotobucketImageShackHerosh မွာလံုး၀မတင္ပါနဲ႕။ Photobucket ဆုိရင္ ပံုျမင္ၾကာလို႕ပါ။ Herosh မွာေတာ့ ပံုက ပ်က္သြားတာမ်ားပါတယ္။ ImageShack လည္းပံုတင္တာျမန္ဆန္ေပမယ့္ အေကာင့္မလုပ္ထားရင္ ပံုပ်က္သြားတာမ်ားပါတယ္။ Script တင္မယ္ဆုိရင္ေတာ့ Google Codes ကိုလံုး၀မသံုးပါနဲ႕လို႕ေျပာေစခ်င္ပါတယ္။ ဘာလို႕လဲဆုိေတာ့ တခ်ိဳ႕ Google Codes မွာ Authentication ထည့္ဖို႕ေတာင္းပါတယ္။ သင့္ Blog site မွာအဲ့ဒါျဖဳတ္ေစခ်င္ရင္ http://techinblogging.blogspot.com/2013/05/authentication-required-pop-up-box.html ကိုသြားဖတ္ပါ။

တျခား hosting မွာရွာၾကံၿပီးတင္ၾကည့္ပါ။ Javascript တင္ခ်င္တဲ့ မိတ္ေဆြေတြအတြက္ဆုိရင္ေတာ့ Your Javascript မွာသြားတင္ပါ။ မတင္မီ သင့္ရဲ႕ Email လိပ္စာေပးပါ။ တင္ၿပီးက ထိုScript link ကသင့္ရဲ႕ အီးေမးလ္ထဲေရာက္ေနမွာျဖစ္ပါတယ္။ ၿပီးရင္ သင္ Blog site ရဲ႕လိုတဲ့ေနရာမွာခ်ိတ္ရုံပဲ။

မင္းခန္႕ (ရန္ကုန္သားဘေလာ့ဂါ)
ppt1459@gmail.com

Kaspersky Anti-Virus 2013 Full License 1 Year

Kaspersky Anti-Virus 2013 Full License 1 Year - Sharebeast
 Kaspersky Anti-Virus 2013 Full License 1 Year
ကဲလာျပန္ျပီ Kaspersky Anti-Virus 2013 Full License 1 Year
ေလးပါ အသစ္ထြက္တာမို႕လို႕တင္ေပးလိုက္ျပီေနာ္
Software Information :
Title : Kaspersky Anti-Virus 2013 Full License 1 Year
Date Released : 2013
Version : 13.0.1.4190
Category : Antivirus
Publisher:  Kaspersky Lab ZAO
Format : RAR
Size : 157 MB
ေဒါင္းရန္  
တင္နည္း 
1. Extract its rar file, a folder will appear named folder No1, No2 and No3
2. Go to Control Panel> Folder Options> View, then at the Hidden files and folders, put a month on Show Hidden Files, folders, and drives. Then click OK
3. For those who have not installed Kaspersky: Copy the folder that is in the No1 to
   for users of Windows 32 bit: C: \ Program Files
   for users of Windows 64 bit: C: \ Program Files (x86)

4. Then copy the folder that is in the No2 folder to C: \ ProgramData
5. Install Kaspersky his last at No3, after the reboot deh

For those who have installed Kaspersky:
Cbi.dll copy is in at No1 folder \ Kaspersky Lab \ Kaspersky Anti-Virus 2013 and pasting into
for users of Windows 32 bit: C: \ Program Files \ Kaspersky Lab \ Kaspersky Anti-Virus 2013
for users of Windows 64 bit: C: \ Program Files (x86) \ Kaspersky Lab \ Kaspersky Anti-Virus 2013
Make sure the kill process avp.exe already in it (see in task manager)

Then copy the existing _1AA7CD13.key No2 in the folder \ Kaspersky Lab \ AVP13 \ Data and paste to C: \ ProgramData \ Kaspersky Lab \ AVP13 \ Data
After that run Kaspersky his
ကဲအဆင္ေျပပါေစေနာ္
တကယ္လို႕မ်ားအဆင္မေျပဘူးဆိုရင္ 
comments ေရးေပးခဲ့ပါ
ေအာင္ေက်ာ္ေဇယ်မိုးဟိန္းထြန္း
azy228@gmail.com 

Screeny 3.4.2 Pro Full Serial Number

Screeny 3.4.2 Pro Full Serial Number - Sharebeast 
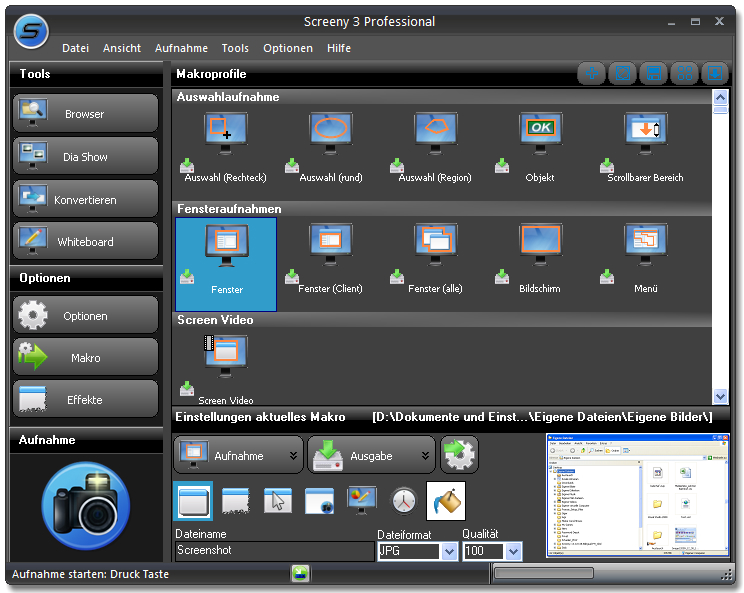
 Screeny 3.4.2 Pro Full Serial Number 
ကဲဒီေကာင္ေလးကေတာ့ 
ကိုယ့္ကြန္ပ်ဴတာ Desktop ကုိဓါတ္ပံုျပန္ရိုက္ျပီး Recording လုပ္ေပးမဲ့ေကာင္ေလးပါ
တစ္ခုထူးျခားတာက ဂိမ္းေတြကိုပါ Recording လုပ္ေပးနိဳင္ပါတယ္


Software Information :
Title : Screeny 3.4.2 Pro Full Serial Number
Date Released : 2013
Version : 3.4.2
Category : Screenshot Software
Publisher: Kaemsoft
Format: RAR
Size: 21.23 MB
ကဲအဆင္ေျပပါေစေနာ္
တကယ္လို႕မ်ားအဆင္မေျပဘူးဆိုရင္
comments ေရးေပးခဲ့ပါ
ေအာင္ေက်ာ္ေဇယ်မုိးဟိန္းထြန္း
azy228@gmail.com

FB comments